
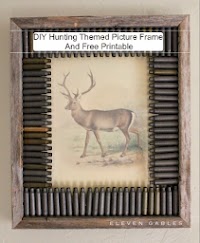
You all have been so generous with your kind words about my son's room ! Thank you. I can't wait to share this tutorial with you for making your very own Bullet Casings Rustic Frame. My son and I came up with this one d…
You all have been so generous with your kind words about my son's room! Thank you.
I can't wait to share this tutorial with you for making your very own Bullet Casings Rustic Frame.
My son and I came up with this one day after spending some time at the shooting range. He came home with a handful of shells and I suggested we make them into something awesome for his room.

Here are the supplies you will need:
- One rustic frame (I purchased this at Hobby Lobby with my coupon)
- One picture hanging kit
- One tube of E6000 Epoxy (adheres wood and metal)
- Approximately 100 bullet casings (uniform in size)
- A really cool image printed on ivory card stock (see below how we downloaded this print for free!)

Install your hanging wire.

Here is the link to this gorgeous free print! To print it, you must enter the website, click on the image to enlarge it, right click it to save it, then open your saved image and hit print. Sometimes, you will have to adjust your size to fit your frame.

Trim your image to accommodate your frame.

After thoroughly washing and drying your bullet casings, start adding epoxy to the frame. Epoxy is stinky and you must be working in a well ventilated room.

Add casings all the way around.


You will end up with an even amount of shells all the way around the frame. Allow the shells to dry fully in a flat, well-ventilated area.

(We ran out for the second frame. We are due for another trip to the range)


This was such a fun project to do together! I can't wait to see what variations you come up with! Overall, each framed picture cost less than $20.00!
See that awesome bulletin board under the brass deer mount? That tutorial is coming next!
Have fun making this frame and stay tuned for more DIY from the Ralph Lauren Inspired Tween room!
xox, Emily